Why do I need the Facebook Pixel when I’m only boosting my posts? Even if you only dabble in Facebook ads and boosted posts, you need to understand the almighty Facebook Pixel.
The Pixel can get super confusing for people, that many just give up and place ads without getting the true value of their ad dollars. This article will help you understand (in plain English) what it is, why you need it, how to install it, and how to verify it’s working, which will set you up for high-converting Facebook ads! So here we go.
What is the Facebook Pixel?
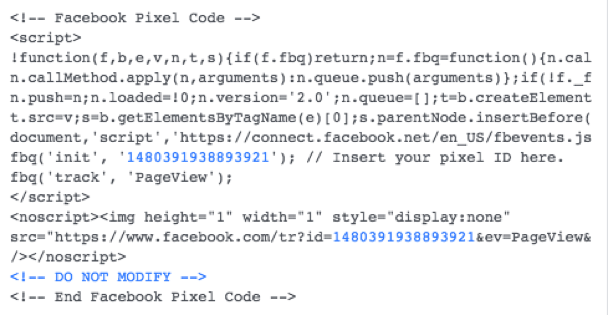
The first thing you need to understand about the Pixel is that it enables you to measure, optimize and build audiences for your Facebook ads. It is a piece of JavaScript generated by Facebook that you place on all pages of your website. This interactive code is able to send information back to Facebook, so essentially your website and Facebook are “talking” to one another. When Facebook acknowledges that someone has been to your website (or a landing/thank you page in conversion cases), it is known as the Pixel “firing.” The Pixel looks like this:

Simply highlight this code and place it on every page of your website. More on that later.
It sounds scary if you’re not the techie-type, but trust me, it’s not all that intimidating once you know what to do. Facebook gives you the code, you plop it on your website and boom! You’re all set to start measuring the effectiveness of the ads. Easy peasy! I’ll dive in a bit deeper on the how-to’s below.
But first, why do I need the Facebook Pixel?
You don’t need it if you’re not concerned about optimizing your ads for conversions or tracking the effectiveness of one ad over another. If you don’t care about building custom audiences for your website, you don’t need the Facebook Pixel. However, if your competitors are doing all these things, it might behoove you to get in the mix, so you can find the ideal customers for your business and build your brand awareness.
Here are some awesome tactics you can do when you have the Facebook Pixel properly installed.
- Understand who is coming to your website based on the Facebook ad you placed.
- Build Custom Audiences (groups of people who have been to your website one or more times) and serve ads to them.
- Test different elements of your ads to determine which component (ad copy, colors, images, time of day) is yielding the highest conversion rate.
How to get my Facebook Pixel
Each ad account has one Pixel associated with it. You can install this Pixel on multiple websites and then track those sites separately, but you only have one code.
Here’s where to find it:
- From your Facebook page, click on the little arrow next to the question mark.

- Click on Manage Ads.
From there, click on the hamburger menu (three lines stacked) in the upper left corner, and click on Pixels.![]()
3. Click on “Set Up Pixel” and choose the option to Copy/Paste the code. Unless you plan on using an integration with Google Tag Manager, Shopify, SquareSpace or similar, the copy/paste option is best for you.
4. Great job, you found your Pixel!
How to install the Pixel correctly?
Placing the Pixel code on every page of your website sounds a bit daunting. But fear not, there are plenty of tools so real people like you can make it work. The Facebook Pixel should be placed between the “head” tags of your website’s theme. If you are using WordPress, you can install one of the following trusted plugins like Insert Headers & Footers or Facebook Conversion Pixel. Or, if you only want to track one page, copy the JavaScript code and paste it between the <head> and </head> on the page you want to track.
Check to See if it’s Working
Once you’ve placed the Pixel on your website, you need to verify to see if it’s working. First thing to do is refresh both your website, and your Facebook Power Editor / Ads Manager. Go make yourself a cup of coffee and allow Facebook to locate the Pixel during your coffee break. Come back, and by that point the Pixel should go from “unverified” to “verified.”
Now You’re all Set!
Are you ready to start using your Pixel? Here are a few things you can do now that your Pixel is set up correctly:
- Create custom retargeting audiences – select audiences who have been to one or more of your web pages.
- Track conversions – understand who is taking desired actions on your site and attribute those actions to Facebook.
To learn more about Social Media Marketing, regardless of your level of expertise, read more of our insights here!


